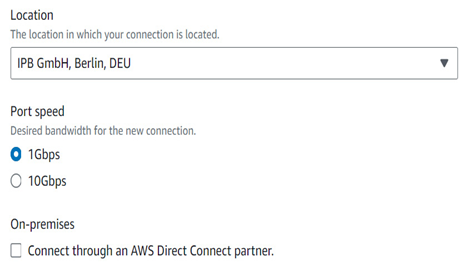
The first step in the process is to navigate to the AWS Direct Connect page within the AWS Management Console and click Create Connection. Under Connection ordering type, select Classic. Next, choose the appropriate Location from the drop-down menu. Port speed options will vary depending upon the location chosen—only a subset will offer 100 gigabits per second.
Note that port speed for a dedicated connection is always either 1, 10, or 100 gigabits per second. For example, it is not possible to order a dedicated connection for 2.5 gigabits per second. Refer to the Physical networking—hosted connection section of this chapter if your needs fall into the middle ground between two speeds like this.

Figure 6.11 – Ordering an AWS Direct Connect within the same facility
In the On-premises section, uncheck the box that says Connect through an AWS Direct Connect partner. The preceding figure shows an example of this for the IPB facility in Berlin.
Under Additional Settings, you can choose to order a MACsec capable port or to bind this connection to an existing LAG. The latter will only be possible if a connection has already been established to your cage. The reasons why you might choose either of these options will be covered later in this chapter.
Upon submission of the request, an AWS Support case will be opened, requesting specific information such as your cage number. Once AWS Support has processed the connection request, you will receive a link for a Letter of Authorization – Connecting Facility Assignment (LOA-CFA). If you do not activate the port on your end within 90 days, billing will automatically start 90 days after the LOA-CFA is issued unless you cancel the process during that time.
Running the cross connect
Once you have an LOA-CFA, you need to have the facility run the cross connect. Procedures for accomplishing this vary by facility, but they typically involve opening a ticket with the facility in question to have their staff connect the appropriate cable type. They will also test the physical path end-to-end—something particularly important with fiber optic cable runs. Check the Cross connects section of the AWS Direct Connect User Guide for the most up-to-date information regarding a particular facility.
Note that it is best to involve the facility early on, long before the LOA-CFA is issued. The facility will have its own lead times to run cross-connects based on staff availability.
Once the cross connect has been run, it is the customer’s responsibility to ensure their physical router has the correct transceiver type and is connected to the patch panel in their cage with appropriate cabling that matches the cross connect. Furthermore, the customer must configure their router port correctly for settings such as auto-negotiation – something that varies depending on the situation. See the Troubleshooting layer 1 issues section of the AWS Direct Connect User Guide for more details.

